Grid vs. Canvas
Now that you have some perspective on the Canvas and Grid controls, it’s a good idea to think a little bit about which scenarios might be most appropriate for each. As mentioned before, the grid control is good for more complex UI layouts. In the last section, you recreated the Expression Blend UI as an example of the power and flexibility of grids. As a general rule, grids should be used in any situation that involves high level layout. This could mean an entire application interface or perhaps just simple windows and pop up screens.
Canvases, on the other hand, are more appropriate when you do not need the flexibility of a structured UI. In the next section, you’ll begin to explore some of the layout controls that serve more specific and explicit purposes. As another general rule, if you aren’t creating a UI that would require a grid, or one of the controls featured in the next section, there’s a good chance you’ll want a canvas. It’s a useful all-purpose tool, especially in cases where a significant amount of animation or user interaction is required, such as a game.
Stack Panel and Border Controls
It’s time to dive into two of the easiest and fun to use controls. With only a bit of exposure to the stack panel and border controls you’ll be able to easily create layouts that would be painstaking without these tools. Let’s start with a simple navigation area. In this case we’ll use the default buttons and a stack panel to quickly create a serviceable navigation panel.
Create a new Expression Blend project by selecting File > New Project > Silverlight 3 Application + Website. Name the file sl04_buttonstack. Browse to save this project in the module03_assets folder.
Select the Stack Panel tool, hidden behind the Grid tool in the Tools panel. Note: The Tools panel will display the last used layout container as a default.
Click and drag anywhere on the artboard to draw a large stack panel control that is about 300 pixels square. Don’t worry about an exact size at this point; you will be adjusting that later in this lesson.
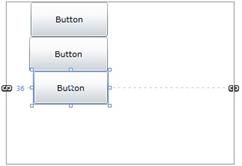
Select the Button tool from the Tools panel, then click and drag to create three buttons inside of the stack panel. Again, don’t worry about the exact size of the buttons. Notice how they stack one on top of the other?
Buttons stack one on top of the other in a Stack Panel
A stack panel does exactly what it promises to do. In this case, we are looking for a horizontal navigation panel though.
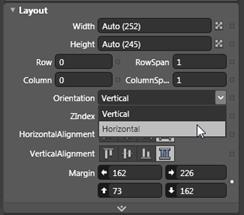
Using the Selection tool, select the stack panel you added in step 3. In the Properties panel, look for the Layout pane, and select Horizontal from the Orientation drop-down menu. Now the buttons line up next to one another.
The stack panel orientation set as horizontal.
Using the Selection tool, resize the stack panel to accommodate the horizontal layout and keep the bottom and top edges somewhat snug.
To adjust the margins, select one of the buttons in the Objects and Timeline panel or in the design view and then hold down Ctrl to select the other two. They may have a default margin already applied; it’s easy enough to customize this.
In the Layout pane of the Properties panel, type 10 in the Margin left text field.
Just like the stack panel control stacks elements according to its namesake, the border control adds a border. You might have noticed that the stack panel does not have the option of a border brush in the Properties panel. This is the case with most of the layout controls.
Select the stack panel in the Objects and Timeline panel, then right-click and select Group Into > Border from the contextual menu.
The Border control you added in the last step should still be selected. In the Properties panel, you’ll need to add some brushes to see the effects of this control.
In the Brushes pane of the Properties panel set the border brush color to #FFE0E3E7, and the background brush to a solid brush set to #FFFAFAFB. In addition to simply adding a border, this control allows you to control each edge and corner individually. In the case of our navigation panel, we can easily dial in a 3-dimensional effect by implying a shadow with thicker right and bottom borders.
In the Appearance pane of the Properties panel, set the top and left borders to 5 pixels, set the right and bottom borders to 15 pixels.
In the corner radius field enter 10, 30, 10, 30. This field starts counting at the top left, then works its way around clockwise.
You are done with this file, you can choose File > Close All Documents. When the Expression Blend dialog box appears, press Don’t Save.