Creating a Canvas Control
Depending on the kind of projects you build in Expression Blend, you may find yourself creating far more canvases than grids or vice-versa. In this case, we’ll start out with a Canvas, purely because it’s a simpler control to get the hang of than the grid. First, you’ll want to know how to identify layout elements.
Open Expression Blend 3 and choose File > New Project. When the New Project window appears, choose Silverlight 3 Application + Website, name the project module03_work and browse to save it in the module03_assets folder, then press OK.
By default, MainPage.xaml contains a UserControl element that will contain everything inside the page, and an element named LayoutRoot. You can see them better if you take a look at the Objects and Timeline panel. You might notice that the LayoutRoot object is indented slightly below UserControl. In fact, MainPage.xaml already contains a nested set of elements and one of them happens to be a Layout Control of the grid persuasion.
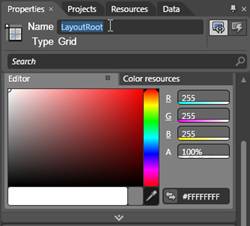
Click the LayoutRoot element in Objects and Timeline and make sure the Properties tab is selected.
At the top of the Properties panel there is a text field labeled Name. The value of this field is LayoutRoot. One method for changing an object’s name is by typing it directly in this text field. Below the Name field is an indication of the elements type. In this case the LayoutRoot element is a grid. This is the default, but since you’ll be working with canvases in this section, you’re going to change the type of this element.
Name and type of the selected object.
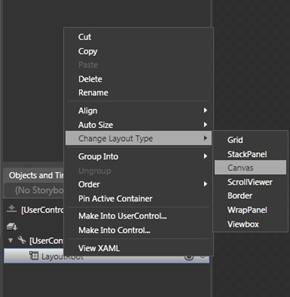
Right-click the LayoutRoot element in the Objects and Timeline panel. In the context menu that appears, choose Change Layout Type > Canvas.
Select Canvas for the layout type.
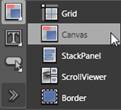
Now you’ll add another canvas, then we can move on to adding and removing elements from a canvas control. Click and hold the Grid (in the Tools panel) and select Canvas.
Activating the Canvas control.
Click and drag to draw a canvas anywhere in the artboard. The numbers on the outside of the bounding box as you drag indicate the size of the canvas you’re about to create. Let go when they’re between 200 and 300. The exact size isn’t too important for this exercise.
Using the Objects and Timeline panel, make sure the new canvas is selected and type ChildCanvas in the Name text field of the Properties panel.
With the canvas still selected, click Background Brush, in the Brushes pane of the Properties panel, and then click on the solid color icon.
When the Color palette appears, choose a light grey background color.
Choose the Rectangle tool and draw a rectangle about 100 pixels square inside the ChildCanvas. Tip: If you hold down the Shift key while dragging, you can create a square.
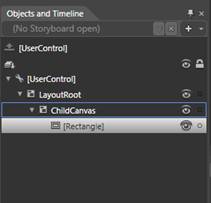
Notice the effect in the Objects and Timeline panel. There are now four elements, each one staggered below the last. This is an indication that these elements are inside of one another. In a moment you’ll see what that means.
The rectangle is contained inside the ChildCanvas layout control