Teil von  SELFPHP
  +++ SELFPHP CronJob-Service :: Jetzt auch als Professional-Version verfügbar! +++

:: Anbieterverzeichnis ::

Globale Branchen

Informieren Sie sich über ausgewählte Unternehmen im Anbieterverzeichnis von SELFPHP  


:: SELFPHP Forum ::

Fragen rund um die Themen PHP? In über 120.000 Beiträgen finden Sie sicher die passende Antwort!  


:: Newsletter ::

Abonnieren Sie hier den kostenlosen SELFPHP Newsletter!

Vorname: 
Name:
E-Mail:


:: Qozido ::

Die Bilderverwaltung mit Logbuch für Taucher und Schnorchler.   


Working with SketchFlow Animation


SELFPHP Produktempfehlung
Microsoft Windows Server 2008
Seite Windows Server 2008
Seite

Microsoft SQL Server 2008
Seite SQL Server 2008
Seite

Microsoft Expression Web 3
Seite Microsoft Expression
Seite


Creating an animation with the SketchFlow Animation panel
Now that your artboard is prepared for animation, you will begin to animate by creating different frames in the SketchFlow Animation panel. SketchFlow will then automatically create the transitions between these frames to create animations. The first animation will be the user’s cursor moving from the right to hover over the yellow boot.

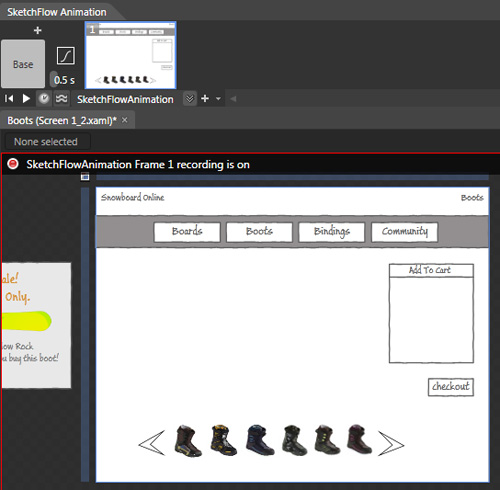
  1. Click the + (plus) sign in the SketchFlow Animation panel to create your first frame. Notice the red border that appears around your artboard, and also a record button. The red border and the record button indicate that Frame 1’s recording is turned on. Additionally, your first frame has appeared as a thumbnail in the SketchFlow Animation panel.


    The red frame indicates that recording is turned on.

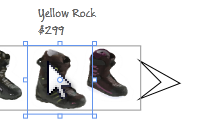
  2. Locate the cursor graphic off screen to the right and drag it directly over the yellow boot (second from the right). This creates an animation automatically.
    You can preview this animation using the controls in the SketchFlow Animation panel.
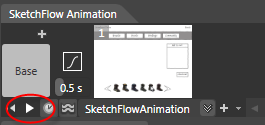
  3. Click the Play button in the bottom-left corner of the SketchFlow Animation panel to see the cursor animate.


    Preview your animation using the Play button.

    Now you’ll create two animations simultaneously: the price of the boot appearing and the boot expanding as if reacting to the cursor.
  4. In the SketchFlow Animation panel, right-click the initial frame and choose Insert New to add a second frame. You are now recording again.
  5. Place your cursor above the boot to highlight the price you placed earlier and click once to select it. Change the Opacity value to 100% to make this visible.
  6. Click the yellow boot once to select it and then grab the bottom right corner and drag it down and to the right slightly to scale the boot. The scale should be subtle, but noticeable.


  7. Click the play button in the SketchFlow Animation panel and now the two frames play back to back to simulate the appearance of a user moving the cursor.
    You may notice that there is a pause between the two frames that diminishes the reality of the animation. You will now edit the hold time of the first frame. By default, a frame will hold for 1 second.
  8. Hover over the first frame and the Edit Hold Time field appears. Click inside the field and change the value to 0 and press return. Press the Play button and you will see your animation play more smoothly.


Seite 2 von 3 1 2 3


Downloads

Copyright © 2010
Microsoft Deutschland GmbH
Alle Rechte vorbehalten.

 Microsoft Deutschland GmbH


:: Premium-Partner ::

Webhosting/Serverlösungen


Premium-Partner MECO Systemhaus GmbH & Co. KG
Premium-Partner PSW GROUP GmbH & Co. KG
Premium-Partner BPI-Systeme
Premium-Partner Pixel X
Premium-Partner
 

:: SELFPHP Sponsoren ::


DM Solutions
Microsoft Deutschland GmbH
twosteps.net - ...Premium-Webhosting
Sedo - Bei uns wird PHP großgeschrieben
hostfactory.ch - OptimaNet Schweiz AG
ZEND - The PHP Company
Kaspersky Labs
HighText iBusiness
SELFPHP Sponsoren
 

Qozido


© 2001-2013 E-Mail SELFPHP OHG, info@selfphp.deImpressumKontakt