Creating a StoryBoard
Animating Collapse and Opacity properties
Triggering a storyboard
Venture into Gaming Using Expression Blend: Module 6
Adding Walls and Creating Animations
If you’ve ever created animation in other applications, you might be familiar with the concept of animating objects on a timeline. In an Expression Blend project you have timelines as well; however there is no central timeline. The animation model in Expression Blend uses something called a storyboard (technically, a storyboard resource), multiple elements within Expression Blend can have their own storyboard which means each element has their own timeline.
Overview of Animation in Expression Blend
When you create a Storyboard resource, you not only create a new timeline on which objects can be animated, but create a C# resource in your application that you can target using code. This will become essential when it’s time to stop, start, or switch timelines.
In this module, you will first add walls to create the boundaries of your game. Your ball needs something to bounce off of besides the paddle and the honeycomb pieces. The animation you will create is the introductory text that appears when the game first loads.
Adding Walls to Your Project
If you open the project file associated with this module and look in the Objects and Timeline panel, you will see there are three walls currently within the game area: Top_Wall, Right_Wall and Left_Wall. You will add the fourth wall at the bottom of the game and configure it so that when it is hit, the player loses a life.
Open the BeeHive Solution file in Blend, then click the Top_Wall element within the Objects and Timeline panel. We have added this wall as well as the two others to this project. This wall is simply a transparent png file that stretches from end to end. However, there has also been a behavior added to this image (For more information on adding behaviors please review Module 5, “Adding and Applying Behaviors”.)
Click the arrow to expand the Top_Wall element, then click the Collision behavior that has been applied. Note within the Collision Properties section that Collide With All has been selected. This ensures that when the ball hits this element it registers as a collision and bounces off. The two other walls have this same behavior, now you will add the fourth wall at the bottom.
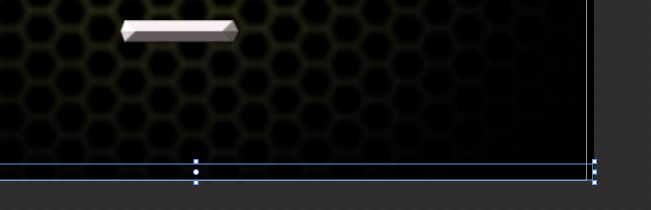
Click once on the LayoutRoot element to select it and the within the Projects tab, expand the “wall_images” folder, then click and drag the Bottom_wall.png file onto the artboard.
The bottom wall graphic appears, reposition it to the bottom of the screen, then click and drag the edges to make sure it spans the entire length of the screen.
In the Assets Panel, click the Behaviors category, then click and drag the Collision behavior onto the bottom Wall. In the Collision Properties section, check the Collide With All checkbox. Then in the Lives property, type the value -1. Unlike the other walls, if the ball hits this wall it means the player missed the ball and therefore is penalized a life and a new instance of the game begins. (Note that you have not enabled the code yet that keeps track of these lives.)