Extra Credit! Changing the Color of the Gradient
In this sample game, the paddle uses a gray to white gradient, which might not always be appropriate for your needs. In this next part of the lesson, you will change the color stops on the gradient.
Using the Selection tool, click the paddle to make sure that it is active.
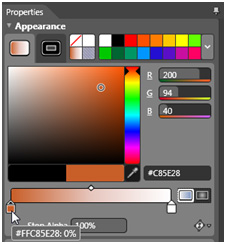
If you do not see the gradient slider at the bottom of the Appearance pane (in the Properties panel), click the Fill box.
To change a color, you can either visually select a color, enter RGB values, or use a hexidecimal value.
Click the color stop on the left side of the gradient slider, then enter the value FFC85E28 into the hexidecimal text box (to the right of the eyedropper in the Appearance pane). Press the Tab key to see the color change.
Click the color stop on the right side of the slider, then click a darker shade of orange, using the color picker.
Once you have finished experimenting you can choose to keep your colors, or set the color stops to be a gray (not default of black) to white gradient.
Choose File > Save or press Ctrl+S to save the file at this point. Keep it open for the next part of this lesson.
Editing the Shape of the Paddle with the Pen tool
In this section you create a custom shape from your rectangle, to be used for the paddle. You will use guides, the Direct Selection and the pen tool to create your custom shape.
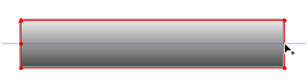
Using the Selection tool, click on the rectangle to make sure it is active.
Click on the Ruler at the top of the artboard and click and drag down until the guide line crosses the center point in the rectangle. This has indicated the center point for you so that you can more easily create the edges of your custom shape.
Typical the Pen tool adds anchor points to create a custom shape or path. In this example, we use the Pen tool to add anchor points to an existing shape.
Select the Pen tool from the Tools panel and click and position the cursor over the intersection of the left side of the rectangle and the guide you created. When you see an arrow with a + (plus sign) click.
Repeat this for the right side.
Adding anchor points to an existing shape.
Choose Select > Deselect to make all anchor points inactive.
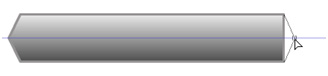
Select the Direct Selection tool and click on the new anchor point you added to the left side. Click and drag out slightly to create an additional angle on your paddle. No exact amount is needed for this practice.
Now, click on the anchor point on the right side and drag it outwards as well, try to adjust these points so that they are equal distances apart on both sides. If it helps, you can use the left and right arrow keys to nudge the points in a straight direction.
Adding a Bevel Effect
In this part of the module, you add a bevel using the Effects pane.
If the Effects pane is not visible, scroll down the Properties panel, until you see Effects, then click the arrow to the left of Effects to reveal additional properties. You see appropriate properties after you select a specific effect.
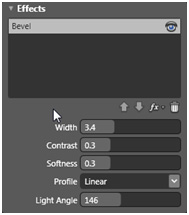
Make sure the paddle shape is selected, and press the Add Effect button. Choose Bevel from the drop-down menu that appears. A default bevel is applied to your paddle shape, and options appear in the Effects pane.
No exact settings are necessary for this step, in fact it is more interesting to adjust the sliders and pick a bevel that you feel works well for your paddle. Make sure that you investigate the Profile drop-down menu, which offers you a choice of bevel edges.
Once you are finished experimenting, use these values in the Bevel options to create the paddle.