Adding Content to Navigation Pages
As noted earlier, SketchFlow is designed to create quick and easy prototypes. As you have just seen, adding screens is fairly straightforward. Adding content to pages is equally straightforward. You’ll start here by adding some drawings with the Pencil tool, and then adding user interface elements with the SketchStyle hand-drawn look.
Double-click the Start node in the SketchFlow Map to open this screen and, from the Tools panel, locate the Pen tool, then click and hold down to expand it and select the Pencil tool.
With the Pencil tool, draw some basic mountain shapes. Don’t worry about precision; it’s a prototype after all. You can always undo steps by pressing Ctrl+Z, or choosing Edit > Undo.
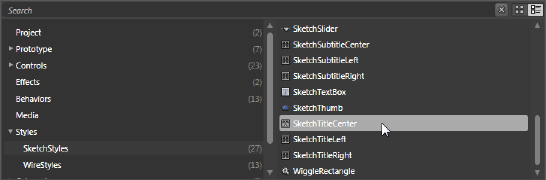
Click the Assets library and locate the Styles section, click the arrow to expand it, then choose SketchStyles. A menu appears with list of elements you can use. Scroll down and locate SketchTitleCenter.
Drag and drop this element onto your artboard. A generic box labeled TextBlock appears.
Click the Selection tool in the Tools panel, then click and drag the title within the upper third of your screen (centered above your mountains).
To expand the width of the title, place your cursor on one of the vertical edges and grab the square anchor point and drag it toward the edge of the screen in order to expand the width.
Double-click inside the title to activate the editing of the text and type Welcome If you need to adjust the width of the title, do so now.
Now apply the TitleText to each of the screens, type the title of each screen somewhere in the body of the screen.
Creating additional Connections
In this next section, you connect back to screens using the tools in the SketchFlow Map panel.
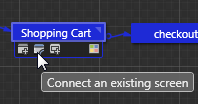
Hover over the Shopping Cart node, then click and drag on Connect an existing screen. Drag back From the Shopping Cart screen back to the Boards screen. This creates a two-way connection.
Continue to create a two-way connection for all of the screens.
Choose File > Save.
Now you will test the project in the SketchFlow player.